

How to create Windows 10 system restore points automatically on startup
On Windows x, Organization Restore is a feature that works similar a time machine that takes your reckoner to an before point in time to opposite system changes using a restore point. This feature is particularly useful to recover from a number of problems when your device isn't working correctly without affecting your files.
Unremarkably, new restore points are created automatically earlier a pregnant outcome occurs, such as when installing a new app, driver, or software update, and you tin can fifty-fifty trigger them manually. The only caveat is that using a restore indicate that isn't recent may end upwardly undoing many unnecessary changes. However, if you want to make sure there is e'er a fresh restore indicate available, you tin can configure System Restore to generate additional checkpoints every time you first Windows x.
In this Windows 10 guide, we'll walk yous through the steps to utilize Task Scheduler along with a PowerShell control to create restore points automatically during startup.
How to create system restore points at startup
To create automatic restore points during startup, you must enable Organisation Restore, disable the restore point creation frequency option, and utilize Task Scheduler to create a task to automate the restore indicate process every time your estimator starts.
Enabling organization restore point service
On Windows 10, Arrangement Restore comes disabled by default, but y'all tin can use these steps to enable the feature:
- Open Outset.
- Search for Create a restore indicate and click the top result to open up the feel.
-
Nether "Protection Settings," if your device organisation bulldoze has "Protection" set up to "Off," click the Configure button.

-
Select the Turn on arrangement protection option.

- Click Utilize.
- Click OK.


In one case you've completed the steps, you can continue with the steps beneath to configure System Restore to create restore points during startup.
If you lot want to disable System Restore, yous can use the same instructions, only on step No. 4, brand certain to select the Disable system protection option.
Disabling system restore betoken frequency
When you enable Organization Restore, Windows 10 doesn't create additional automatic restore points if there's another restore point that has been created inside the final 24 hours. Although this restriction won't apply when triggering a new restore indicate manually or automatically as a result of an app, driver, or update installation, it'll prevent Task Scheduler from creating restore points during startup. However, it's possible to avoid this problem by disabling the frequency option using these steps:
Alert: This is a friendly reminder that editing the Registry is risky, and information technology can cause irreversible damage to your installation if yous don't do information technology correctly. It'due south recommended to make a full backup of your PC before proceeding.
- Use theWindows key + R keyboard shortcut to open theRun control.
- Typeregedit, and clickOK to open the Registry.
-
Browse the following path:
HKEY_LOCAL_MACHINE\SOFTWARE\Microsoft\Windows NT\CurrentVersion\SystemRestoreQuick Tip: On Windows ten, y'all can now copy and paste the path in the Registry'due south address bar to chop-chop jump to the key destination.
-
Right-click the SystemRestore (folder) key, select New, and click on DWORD (32-bit) Value.

- Name the key SystemRestorePointCreationFrequency and press Enter.
-
Double-click the newly created key and brand sure its value is set to 0.

-
Click OK.


After completing the steps, Job Scheduler should be able to run the task with the corresponding command to create new restore points at every startup.
If you lot no longer want to create new checkpoints at startup, y'all can ever revert the Registry changes using the same instructions, just on step No. 4, make sure to correct-click the SystemRestorePointCreationFrequency DWORD and select the Delete option, then delete the task using the steps below.
Creating a system restore point during startup
The side by side step is to employ the Task Scheduler to create a new chore that will run at startup to trigger a new restore point using these steps:
- Open Showtime.
- Search for Task Scheduler, click the top result to open up the experience.
- Right-click the Task Scheduler Library binder.
-
Click the Create Task option.

- Click on the Full general tab.
- In the "Name" field, type a descriptive name for the task. For instance, My Restore Point Startup.
- Under "Security options," select the Run whether the user is logged on or non option.
-
Check the Run with highest privileges selection.

- Click on the Triggers tab.
-
Click the New button.

-
Use the "Begin the job" driblet-downward menu and select the At startup option.

- Click the OK button.
- Click on the Actions tab.
-
Click the New button.

- Use the "Actions" drop-downwardly carte and select the Start a program option.
-
In the "Program/script" field, blazon the following command:
powershell.exe -
In the "Add together arguments (optional)" field, type the following command:
-ExecutionPolicy Bypass -Command "Checkpoint-Calculator -Description \"My Restore Point Startup\" -RestorePointType \"MODIFY_SETTINGS\""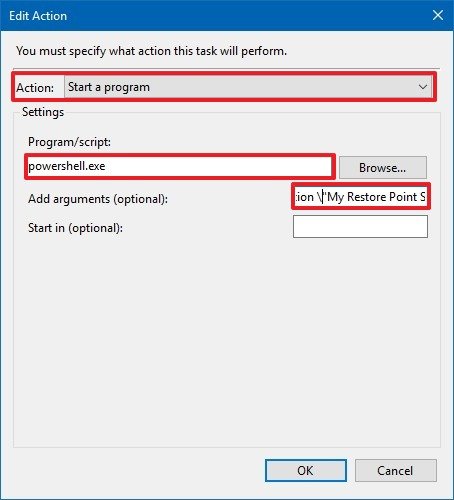
- Click the OK push button.
- Click the Conditions tab.
-
Nether "Ability," clear the following two options:
- Stop if the calculator switches to battery power.
- Showtime the task only if the computer is on AC power.

- Click the OK button.
-
Specify the password for your account.

- Click the OK button.


Once you lot've completed the steps, the new task will announced in the Task Scheduler Library binder, and information technology'll run to create a new organisation restore point every fourth dimension you beginning your device.
You tin ever terminate running the task by right-clicking the chore inside the "Chore Scheduler Library" binder and selecting the Delete option.
Checking system restore points
After following the above instructions, you can make sure that system restore points are being created by restarting your device, waiting effectually 5 minutes, and using these steps:
- Open Start.
- Search for Create a restore betoken and click the tiptop event to open the experience.
- Click the Organization Restore push button.
- Select the Cull a unlike restore point or click the Next button.
Afterwards completing the steps, if the job ran as expected, a new restore betoken with the "My Restore Betoken Startup" description should announced in the list.
If you're not seeing new restore points being created, review the steps equally the problem is likely a typo or mistake in the command.
Moving forward, every time you plough on or reboot your device, Windows 10 will create a restore signal that you can use to revert system changes if your reckoner isn't working correctly without affecting your files or removing many of the configurations yous may have recently made.
More Windows 10 resources
For more helpful articles, coverage, and answers to common questions about Windows x, visit the following resources:
- Windows 10 on Windows Fundamental – All you need to know
- Windows ten help, tips, and tricks
- Windows x forums on Windows Fundamental

Oh Dear
New study reveals Microsoft'south future AR strategy; HoloLens 3 is dead
Business Insider has today published a follow-upwardly report with more details about Microsoft'due south canceled HoloLens iii augmented reality headset. The partnership with Samsung is said to include a headset with a set of screens inside, powered past a Samsung phone in your pocket.

Keeping it affordable
Review: Surface Laptop SE is the new standard for Thousand-viii Windows PCs
Starting at just $250, Microsoft's first foray into affordable laptops for the education market is a winner. With a gorgeous pattern, fantabulous thermals, and a fantastic typing experience, Microsoft would practice right to sell this directly to consumers as well. Allow'southward merely hope Intel can make a better CPU.

Source: https://www.windowscentral.com/how-create-system-restore-points-automatically-startup-windows-10
Posted by: garzaholoccure85.blogspot.com
0 Response to "How to create Windows 10 system restore points automatically on startup"
Post a Comment